Air source heat pumps are a revolutionary way to transfer heat into homes. The installation of ASHP(air source heat pump), which is dependent on the home's design, is the solution. The entire process seems to be incredibly difficult.
However, anyone can install it by following a simple ASHP installation process. This article will provide you with the best guidance for following the easy process of air source heat pump installation.
An air source heat pump is a system that heats your home using the lowest carbon emissions. It absorbs heat from the outdoor air and uses that heat to increase the indoor temperature.
In other words, we can say that an air-source heat pump (ASHP) transports heat from the outside to the inside of a building. It uses a refrigerant system composed of a compressor and a condenser to transfer heat.
The ASHP releases heat in another by the principles of vapor compression refrigeration. They are sometimes referred to as "reverse-cycle air conditioners" and can be utilized as a space heater or cooler. ASHP works effectively both in winter and summer. You can choose from a variety of ASHP types that are available on the market.

Typically, an air-source heat pump is installed outside a building. A fluid absorbs heat from the air at a low temperature. This fluid is heated as it travels via a compressor, which is then sent to the home's heating and hot water systems.
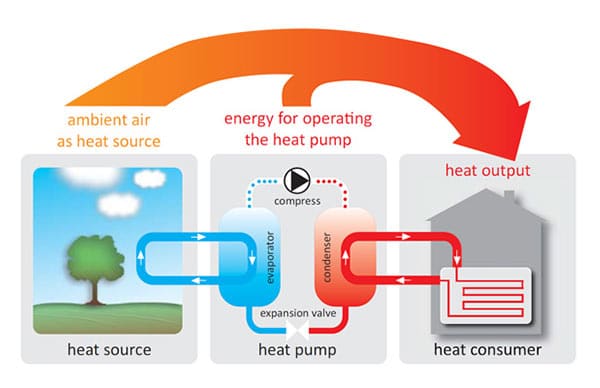
The pump compresses the liquid to raise its temperature using power. It then condenses into a liquid to release the heat it has been holding. This is how ASHP works. Before installing ASHP, you must consider some facts so that the pump works effectively after fixing.
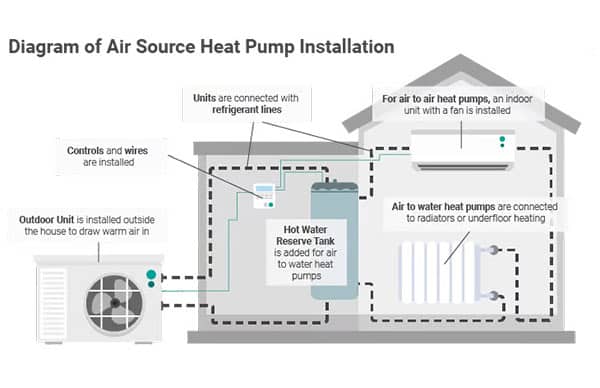
Diagram of Air Source Heat Pump Installation
Are you worried about installing an ASHP? We have the best solution for you. Here are step-by-step processes you can follow easily for ASHP installation.
Follow these easy step-by-step processes of air source heat pump installation:
Don’t forget to inspect the property before installation. If you are confused, let engineers inspect the property and let them prepare a report. If the report is negative, look for another place for the installation.
After inspecting and selecting the place for installation, you can start with indoor unit installation. The installation process will be different based on the system (duct and ductless).
If you install a ductless system, the installer will choose a spot on the wall inside the zone that is clear of obstructions to put in the installer unit. The indoor unit will be scaled on a mounting plate by the installer, who will then attach the indoor unit to it.
If you install a ducted system, your installer will also require access to your ductwork so that they can connect the indoor unit to the ductwork. Any necessary repairs are needed for your existing ductwork; you can also do that now. If there is no existing ductwork, install it first to circulate air.
You must place an entry point between the indoor unit or air handler and the outside condenser. The installer will drill a hole in the wall to run piping and lines to make this.
This will exit the condensate drain line which will carry water from the interior unit to the outside electrical and refrigerant lines. For a mini-split system, the installer will use a hole saw to cut holes in the exterior of your house. Place the interior air handler in your house at the entry point in a ducted system.
The interior units are next linked to the condensate and refrigerant lines. The indoor and outdoor condensers can cycle through refrigerant lines. The lines will carry warm or cold liquid to the indoor units. It is subsequently forced as air in the zone, depending on whether your air source heat pumps are heating or cooling.
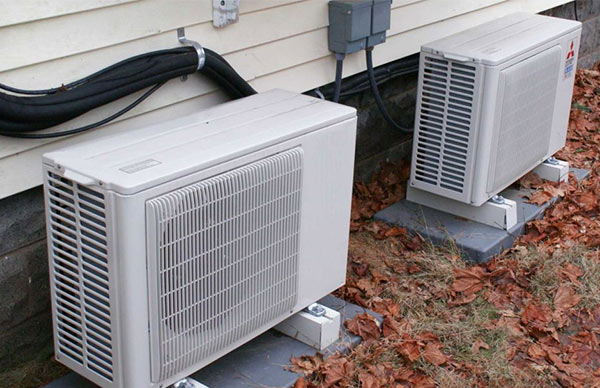
When the indoor unit is done, your installer will install the outdoor unit. installers generally place a concrete slab on the ground to hold the outdoor condenser for more extensive use.
Your contractor will install the outdoor unit once the indoor unit is finished. Installers generally place a concrete slab on the ground to hold the outdoor condenser for more extensive (packaged or central systems). It will frequently be put on the side of your property if this is a mini-split system or an air source heat pump with a minor system. In colder regions, where the installer will ideally position the system above potential snowlines, this will often be raised above the ground.
Your technician will connect the indoor and outdoor units using the refrigerant line. After that, they will connect electrical wires after installing the indoor and outdoor units. To protect the wiring from the elements, installers will either insulate these wires or route the lines through conduits on the side of your house. The technician will draw a line in the house's exterior to prevent condensation from the unit inside your home.
A few further adjustments your technician should perform to complete the system installation. One is to secure the pipes by fastening them to the sides of your house. Another option is to add sensors.
Many air source heat pumps are equipped with sensor technology to tell your thermostat the temperature in various zones. Many air source heat pumps now have wireless remote controls for temperature control, enabling online monitoring and adjustments on a computer, tablet, or smartphone.
A standard installation should take six to eight hours to complete if you hire an expert technician. If they begin in the morning, they will end in the late afternoon.
Depending on some factors, the time can change at any time. Weather conditions, changes to the air ducts, unexpected electrical issues, and any other accessories can extend the installation process’s time.
The cost of installing Air source heat pumps depends on the model and size of the pump. If the installation process is difficult, the installation cost will be high.
As an approximate estimate, a typical system installation costs between $2500-$10,000. The lowest cost is $2500, and the highest is $10,000. If you are looking for an average cost of installation, then it is $5500.
Remember that you can reduce the cost by combining the installation with other building work. Through proper maintenance, one can reduce expenses as well.
After installation, the following step is maintenance. Proper maintenance keeps the air source heat pump lifespan long. You can follow some tips for air source heat pump maintenance.
Tips for air source heat pump maintenance:
One can easily follow these maintenance tips, but it is best to hire an expert for installation.
Are there any problems with the ASHP installation? It is pretty common as you are not an expert in this field. If you plan to do it by yourself, then there is a high chance that you will ruin the essential parts of ASHP. There are some health risks as well while connecting wiring and electricity. So it is best to hire an expert.
Experts know every step and all the risks. They work with proper protection without ruining any ASHP parts. You don’t have to do anything. All you have to do is sit and wait; experts will do all the job for you. To keep yourself tense-free, you should hire an expert.
Finally, follow the easiest step-by-step process to get the best result for the air source heat pump installation discussed in this article. Professionals recommend all these steps, and following this guideline is the wisest choice.
