Maintaining and repairing your dryer vent hose is crucial for the efficient and safe operation of your dryer. Here's a comprehensive guide on repairing a dryer vent hose, including when to replace it and preventive measures.
The dryer vent hose plays a vital role in expelling hot air and lint from your dryer. A well-maintained vent hose ensures efficient drying and reduces the risk of fire hazards.
Regular inspection and maintenance can prevent common issues such as clogging, tearing, and inefficient drying.
★ Excessive Lint Accumulation: If you notice lint around the dryer or in the lint trap, it could indicate clogged vents.
★ Overheating or Frequent Shut-offs: These are signs that the vent isn't managing airflow properly.
★ Extended Drying Times: This usually happens when hot airflow is restricted due to obstructed vents.
★ Visible Damage: Look for cracks, holes, or tears in the hose.
★ Strange Noises or Smells: Rattling or burning smells may indicate a damaged vent hose.

➣ Unplug the Dryer: Always start by disconnecting your dryer from the power source for safety.
➣ Create Space: Remove your dryer from the wall to access the vent hose.
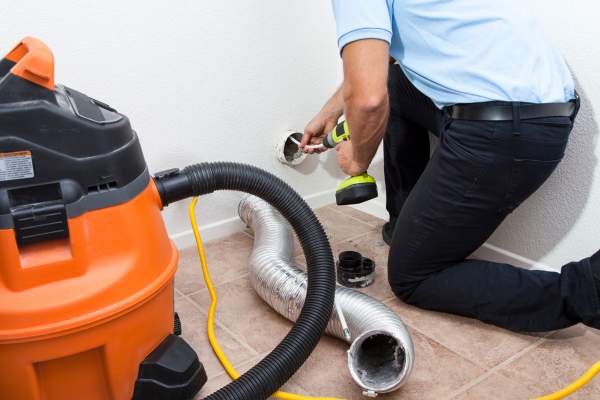
➣ Locate and Inspect the Vent Hose: Check for any visible damage or blockages.
➣ For Minor Tears: Use aluminum tape to patch any small holes or tears. Avoid using duct tape as it's not suitable for high-heat situations.
➣ Straightening a Crushed Hose: If the hose is crinkled or bent, straighten it out to ensure unobstructed airflow.
➣ Replacing the Hose: If the hose is severely damaged, it's best to replace it. First, detach the old hose and inspect for lint or debris. Then, attach the new hose using clamps and seal it with foil duct tape for an airtight connection.
➣ Measurements: Ensure the hose is long enough to reach from the dryer to the exterior vent without bending.
➣ Material: Opt for a durable material like aluminum or flexible metal.
➣ Diameter: Most hoses have a standard diameter of 4 inches, but always double-check for compatibility
➣ Reattach the Hose: Secure the new or repaired hose to the dryer and the external vent outlet, ensuring a snug fit.
➣ Testing: After reattachment, plug in your dryer and test it to ensure it runs smoothly and expels air properly.
➣ Regular Cleaning: Clean the vent hose periodically to prevent lint buildup.
➣ Annual Inspections: Check the hose annually for any signs of wear or damage.
➣ Proper Installation: Ensure the hose is correctly installed and secured to prevent issues.
Whether you're fixing a minor tear or replacing the entire hose, understanding how to repair a dryer vent hose is essential for any homeowner. Regular maintenance and prompt repairs can greatly enhance your dryer's efficiency and safety.
If you're unsure about handling the repair yourself, don't hesitate to seek professional assistance. Remember, a well-maintained dryer vent hose is key to preventing fires and ensuring the longevity of your appliance.
